> ## Documentation Index
> Fetch the complete documentation index at: https://docs.gizmo.antimlabs.com/llms.txt
> Use this file to discover all available pages before exploring further.
# Editor Walkthrough
> A complete guide to the Gizmo editor. Generate an asset from a prompt, build and edit a scene by hand, tune physics and robotics settings, then export to your simulator.
The Gizmo editor turns a text prompt into a simulation-ready 3D scene: meshes,
materials, articulated joints, and physics. This page walks through everything
you can do in the editor, in the order you will usually do it. It is written for
sim creators, so it errs on the side of explaining each panel rather than
assuming you already know where things live.
First time in the editor? An interactive in-app tour pops up automatically and
highlights each panel described below. You can re-open it any time from the
**?** (help) button in the top-right of the toolbar.
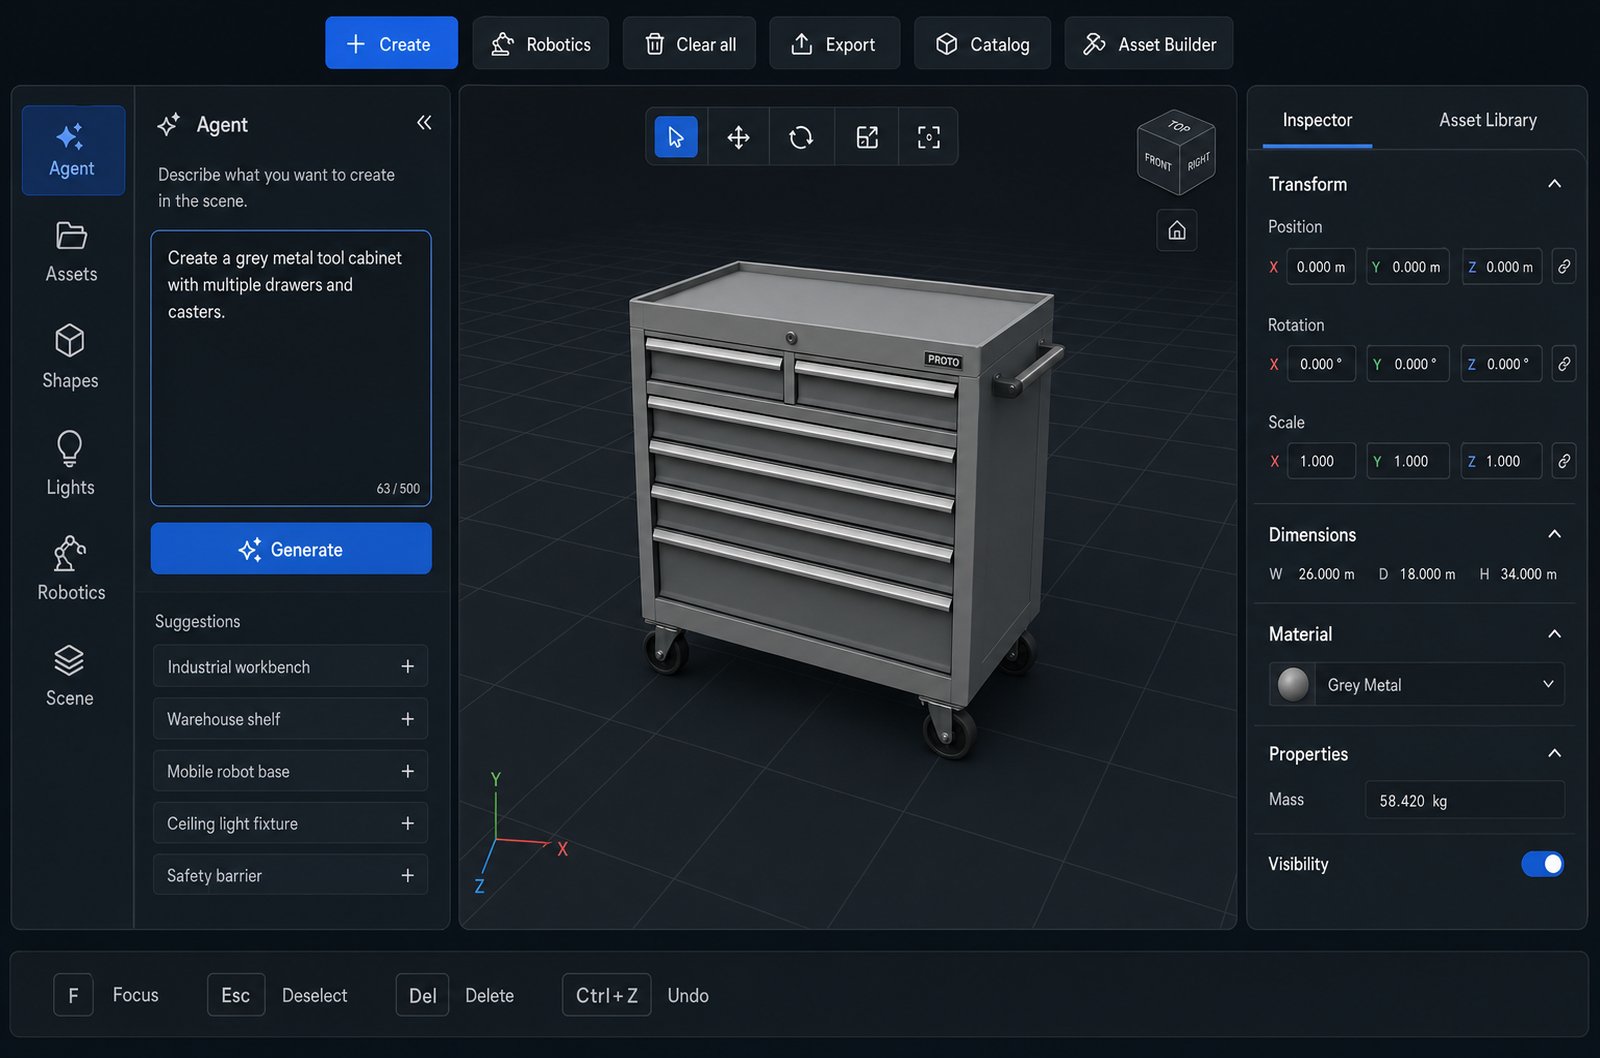
## The layout
The editor has three regions:
* **Left panel** is your toolset, organized into tabs:
* **Agent** generate with AI (this is where most scenes start).
* **Assets** every generated or placed asset in the scene, as a list.
* **Shapes** the individual primitives (boxes, cylinders, and so on).
* **Lights** the lights you have added plus the global scene lighting.
* **Robotics** robot spawns, semantic regions, and sensor anchors.
* **Scene** scene type, physics defaults, and export settings.
* **Center** is the 3D viewport, with the transform and Play tool strip in the
top-left corner.
* **Right panel** is the **Inspector** (properties of the selected object) and
the **Asset Library** (every asset generated for this scene, ready to re-place).
 You can toggle the left and right panels with the **\[** and **]** keys to give
the viewport more room.
## 1. Describe what to build
On the **Agent** tab, type what you want in plain English and press **Enter**.
You can describe a single asset, a full scene, or a robot workspace.
> a red metal toolbox with a hinged lid and a carry handle
You can toggle the left and right panels with the **\[** and **]** keys to give
the viewport more room.
## 1. Describe what to build
On the **Agent** tab, type what you want in plain English and press **Enter**.
You can describe a single asset, a full scene, or a robot workspace.
> a red metal toolbox with a hinged lid and a carry handle
 ### Add a reference image (optional)
Click the **paperclip** to attach a photo or sketch, or just drag an image onto
the bar. Gizmo matches the generated asset's shape, proportions, and materials
to your reference. This is the fastest way to get a specific look.
### Write prompts that generate well
The agent builds joints and collision geometry around the parts you describe, so
the more concrete you are about structure, the better the result:
* **Name the moving parts.** Say which pieces should open, rotate, or slide (for
example "a cabinet with two hinged doors and one sliding drawer"). Each becomes
an articulated joint.
* **Give a rough size.** "About 1.2 m tall" keeps the asset at a realistic scale
for a robot to interact with.
* **Call out materials and affordances.** Mention handles, knobs, or grips you
want a robot to grasp, and the material (metal, wood, plastic) for each part.
* **Start simple, then iterate.** Generate the core object first, then refine it
with follow-up messages (see step 3).
Browse [Starter Prompts](/starter-prompts) for prompt patterns that reliably
produce clean, articulated assets.
## 2. Watch the pipeline run
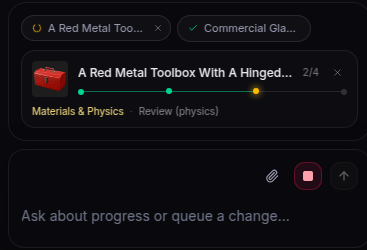
After you submit, a progress panel streams each stage of generation live, just
above the input bar. Under the hood the agent plans the asset, generates each
component, assembles and reviews them, refines materials, then wires up joints
and physics, validating the result for robotics use.
### Add a reference image (optional)
Click the **paperclip** to attach a photo or sketch, or just drag an image onto
the bar. Gizmo matches the generated asset's shape, proportions, and materials
to your reference. This is the fastest way to get a specific look.
### Write prompts that generate well
The agent builds joints and collision geometry around the parts you describe, so
the more concrete you are about structure, the better the result:
* **Name the moving parts.** Say which pieces should open, rotate, or slide (for
example "a cabinet with two hinged doors and one sliding drawer"). Each becomes
an articulated joint.
* **Give a rough size.** "About 1.2 m tall" keeps the asset at a realistic scale
for a robot to interact with.
* **Call out materials and affordances.** Mention handles, knobs, or grips you
want a robot to grasp, and the material (metal, wood, plastic) for each part.
* **Start simple, then iterate.** Generate the core object first, then refine it
with follow-up messages (see step 3).
Browse [Starter Prompts](/starter-prompts) for prompt patterns that reliably
produce clean, articulated assets.
## 2. Watch the pipeline run
After you submit, a progress panel streams each stage of generation live, just
above the input bar. Under the hood the agent plans the asset, generates each
component, assembles and reviews them, refines materials, then wires up joints
and physics, validating the result for robotics use.
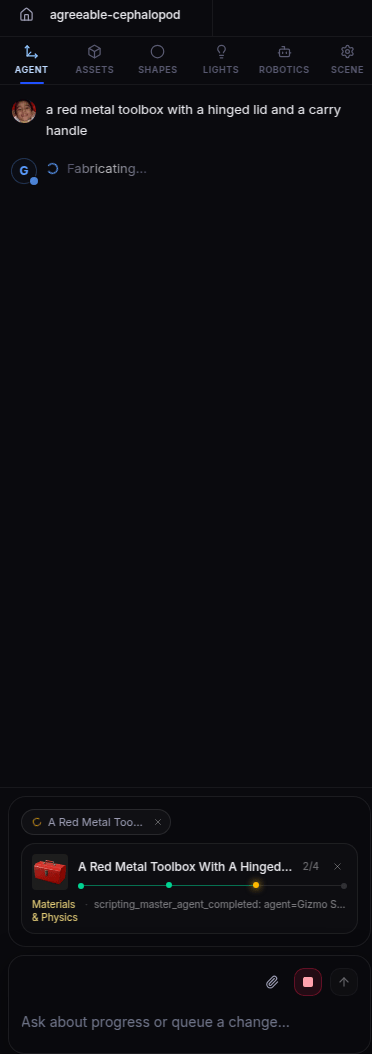 While it runs you can:
* **Queue a follow-up.** Type another instruction and it is applied after the
current step finishes.
* **Stop.** Cancel the run with the stop button.
When generation finishes, the asset appears in the viewport and is saved to this
scene's **Asset Library** for re-use.
While it runs you can:
* **Queue a follow-up.** Type another instruction and it is applied after the
current step finishes.
* **Stop.** Cancel the run with the stop button.
When generation finishes, the asset appears in the viewport and is saved to this
scene's **Asset Library** for re-use.
 ## 3. Keep chatting to edit the scene
The Agent panel is not just for the first generation. Once a scene exists, keep
typing instructions to change it: "make the drawer deeper", "add a second shelf",
"swap the handle for a round knob", or "scatter four mugs on the counter". The
agent edits the existing scene in place rather than starting over, so you can
build up a complex environment one instruction at a time.
## 4. Navigate and edit in the viewport
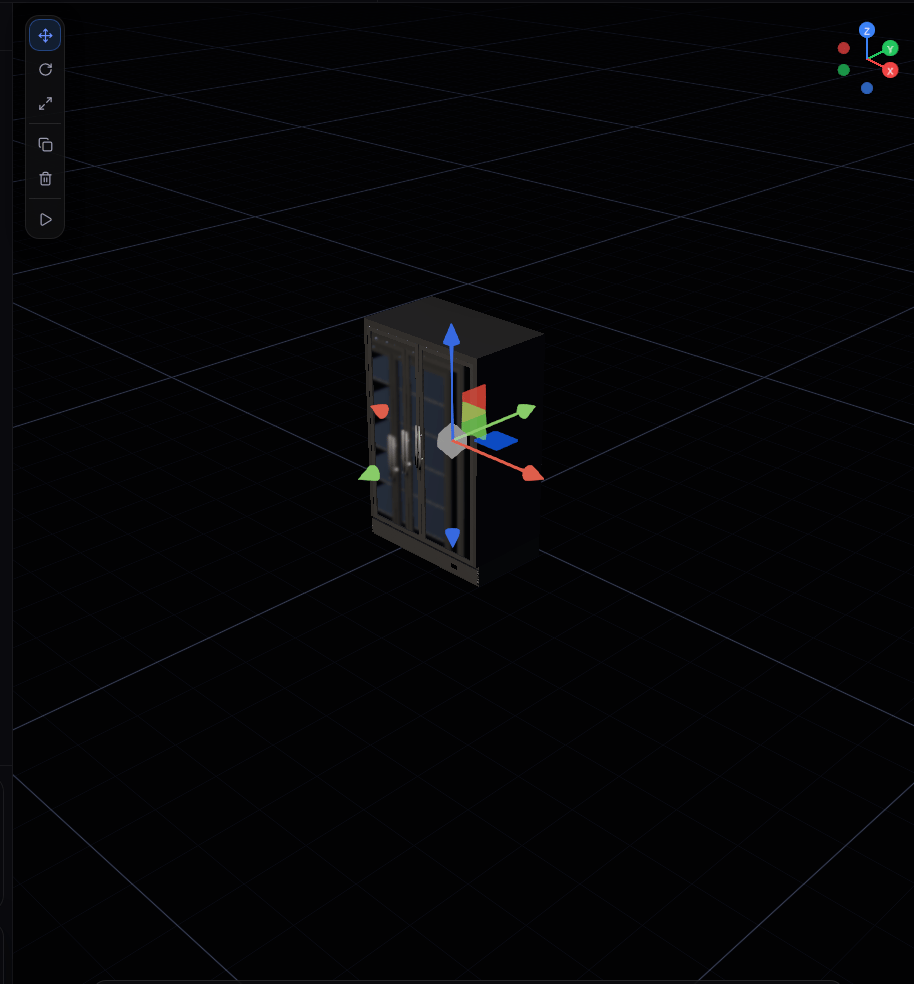
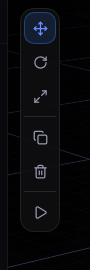
The tool strip in the top-left of the viewport controls how you edit selected
objects:
| Tool | What it does |
| ---------- | ------------------------------------------------------------- |
| **Move** | Translate the selection along the gizmo axes |
| **Rotate** | Rotate the selection |
| **Scale** | Resize the selection |
| **Play** | Simulate physics in the browser to check joints and stability |
When something is selected, the strip also shows **Duplicate** (Ctrl+D) and
**Delete** (Del).
## 3. Keep chatting to edit the scene
The Agent panel is not just for the first generation. Once a scene exists, keep
typing instructions to change it: "make the drawer deeper", "add a second shelf",
"swap the handle for a round knob", or "scatter four mugs on the counter". The
agent edits the existing scene in place rather than starting over, so you can
build up a complex environment one instruction at a time.
## 4. Navigate and edit in the viewport
The tool strip in the top-left of the viewport controls how you edit selected
objects:
| Tool | What it does |
| ---------- | ------------------------------------------------------------- |
| **Move** | Translate the selection along the gizmo axes |
| **Rotate** | Rotate the selection |
| **Scale** | Resize the selection |
| **Play** | Simulate physics in the browser to check joints and stability |
When something is selected, the strip also shows **Duplicate** (Ctrl+D) and
**Delete** (Del).
 ### Camera and selection shortcuts
| Key | Action |
| ----------------------------- | ------------------------------ |
| **WASD** | Fly the camera |
| **Right-mouse drag** | Look around |
| **F** | Focus the selected object |
| **Esc** | Deselect |
| **Del** | Delete the selection |
| **Ctrl+Z** / **Ctrl+Shift+Z** | Undo / Redo |
| **Ctrl+D** | Duplicate the selection |
| **\[** / **]** | Toggle the left / right panels |
### Test physics with Play
Press **Play** to drop the scene into a live physics simulation right in the
browser. Use it to confirm that doors swing the right way, drawers slide along
the correct axis, and nothing falls through the floor or jitters. **Pause** to
freeze, and **Stop** to return to editing exactly where you left off. Running
Play before exporting catches most articulation and stability problems early.
## 5. Group parts so joints work
Joints connect parts that move relative to each other (a lid to a box, a drawer
to a cabinet). Generated assets are grouped for you, but when you build or edit
by hand you may need to group parts yourself so they articulate as one mechanism.
On the **Shapes** or **Assets** tab, click **Group**, tick the parts that belong
together (you need at least two), then click **Done**. Group by *mechanical
function*: everything that should move together as one rigid body, with the parts
that rotate or slide relative to it kept as separate, jointed pieces.
See [Joints and Physics](/joints-and-physics) for how articulation is modeled.
## 6. Add things by hand
Generation gets you most of the way, but you can also build or extend a scene
manually.
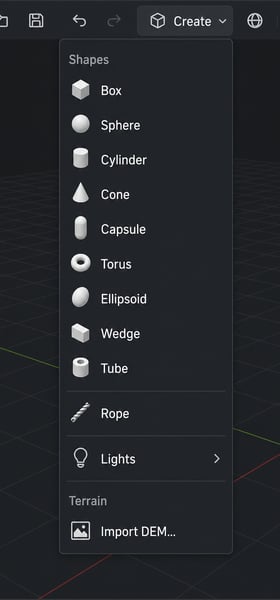
* **Create menu** (toolbar) and the **Shapes** tab drop in primitives: box,
sphere, cylinder, cone, capsule, torus, ellipsoid, wedge, tube, and more. The
Create menu also adds a **Rope**, directional/point/spot **Lights**, and a
**Terrain > Import DEM** option for bringing in GeoTIFF heightfields.
* **Robotics menu** (toolbar) opens the robot library and adds **robot spawns**,
**semantic regions**, and **sensor anchors** (covered in step 8).
### Camera and selection shortcuts
| Key | Action |
| ----------------------------- | ------------------------------ |
| **WASD** | Fly the camera |
| **Right-mouse drag** | Look around |
| **F** | Focus the selected object |
| **Esc** | Deselect |
| **Del** | Delete the selection |
| **Ctrl+Z** / **Ctrl+Shift+Z** | Undo / Redo |
| **Ctrl+D** | Duplicate the selection |
| **\[** / **]** | Toggle the left / right panels |
### Test physics with Play
Press **Play** to drop the scene into a live physics simulation right in the
browser. Use it to confirm that doors swing the right way, drawers slide along
the correct axis, and nothing falls through the floor or jitters. **Pause** to
freeze, and **Stop** to return to editing exactly where you left off. Running
Play before exporting catches most articulation and stability problems early.
## 5. Group parts so joints work
Joints connect parts that move relative to each other (a lid to a box, a drawer
to a cabinet). Generated assets are grouped for you, but when you build or edit
by hand you may need to group parts yourself so they articulate as one mechanism.
On the **Shapes** or **Assets** tab, click **Group**, tick the parts that belong
together (you need at least two), then click **Done**. Group by *mechanical
function*: everything that should move together as one rigid body, with the parts
that rotate or slide relative to it kept as separate, jointed pieces.
See [Joints and Physics](/joints-and-physics) for how articulation is modeled.
## 6. Add things by hand
Generation gets you most of the way, but you can also build or extend a scene
manually.
* **Create menu** (toolbar) and the **Shapes** tab drop in primitives: box,
sphere, cylinder, cone, capsule, torus, ellipsoid, wedge, tube, and more. The
Create menu also adds a **Rope**, directional/point/spot **Lights**, and a
**Terrain > Import DEM** option for bringing in GeoTIFF heightfields.
* **Robotics menu** (toolbar) opens the robot library and adds **robot spawns**,
**semantic regions**, and **sensor anchors** (covered in step 8).
 ### Drop in premade assets
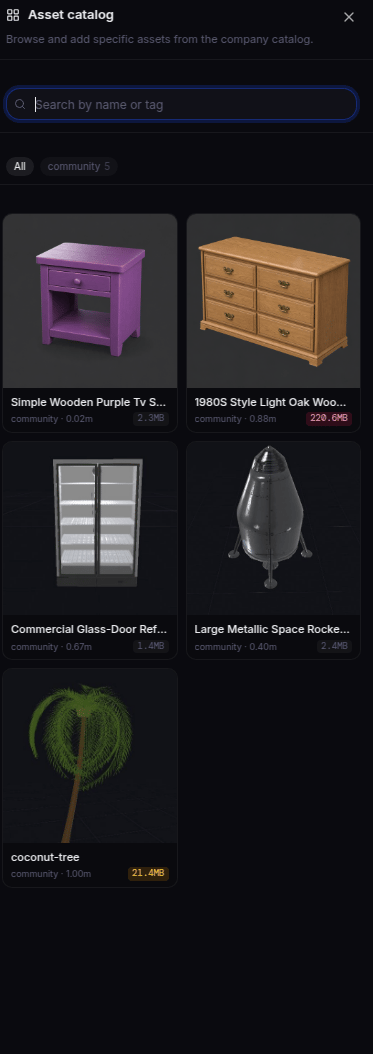
Click **Catalog** in the toolbar to browse a library of ready-made, physics-ready
props. Search by name, preview in 3D, and place directly into your scene with no
waiting for generation.
### Drop in premade assets
Click **Catalog** in the toolbar to browse a library of ready-made, physics-ready
props. Search by name, preview in 3D, and place directly into your scene with no
waiting for generation.
 ### Build a single asset in isolation
Click **Asset Builder** in the toolbar to open a focused workspace for creating
or refining one asset on its own, away from the full scene. Save it to the Asset
Library when you are done, and it becomes available to place like any other asset.
## 7. Inspect and fine-tune
Select any object to open the **Inspector** on the right. This is where you dial
in the exact values a simulator needs.
### Build a single asset in isolation
Click **Asset Builder** in the toolbar to open a focused workspace for creating
or refining one asset on its own, away from the full scene. Save it to the Asset
Library when you are done, and it becomes available to place like any other asset.
## 7. Inspect and fine-tune
Select any object to open the **Inspector** on the right. This is where you dial
in the exact values a simulator needs.
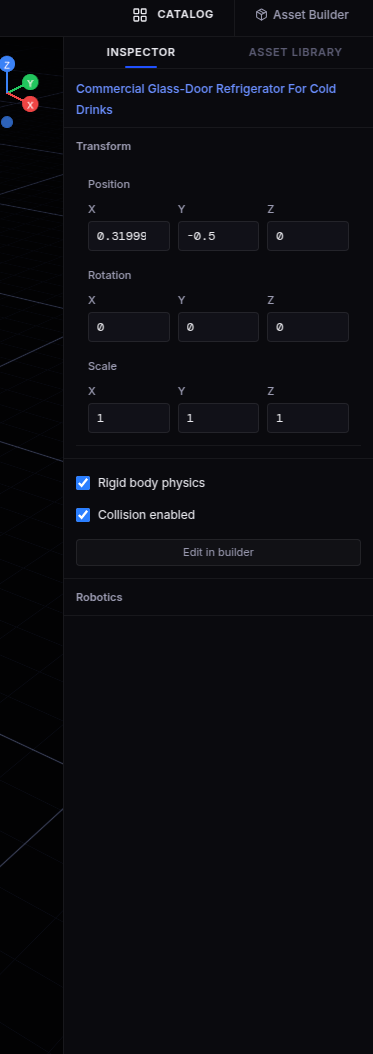 The Inspector exposes:
* **Transform** position and rotation (and scale), edited numerically or with the
viewport gizmos.
* **Dimensions** the primitive's size parameters.
* **Material** surface type and color, with physically based presets (metal,
plastic, wood, glass, rubber, and more).
* **Rigid physics** mass, density, friction, and restitution, plus advanced
options like continuous collision detection, linear and angular damping, and
center of mass.
* **Robotics properties** on assets: body type (dynamic, static, articulated,
kinematic, or visual-only) and collision approximation (convex hull, box,
sphere, capsule, trimesh, or compound). These map directly to how the asset
behaves in the simulator.
* **Joints** the joint type and its limits, stiffness, and damping for articulated
parts.
The **Asset Library** tab (next to Inspector) lists every asset generated for
this scene, so you can re-insert copies without regenerating. It also has an
**import** button for bringing in your own USD, USDZ, or GLB assets.
After generating, it is worth a quick check:
* Are the dimensions reasonable for a robot to interact with?
* Are doors, drawers, and lids grouped correctly?
* Do joints rotate or slide in the expected direction (use **Play**)?
* Are collision shapes present and is mass / friction populated?
## 8. Set up the scene for robotics
The **Robotics** tab and the **Robotics** menu add the entities a simulator
needs beyond geometry:
* **Robot spawn** marks where (and which) robot enters the scene. Use the
**Robotics > Browse robot library** dialog to search the built-in MuJoCo
Menagerie catalog or pick from your own uploaded MJCF/URDF robots. You can
also embed a specific robot at export time (see step 10).
* **Semantic region** a named volume (for example "pickup zone" or "goal area")
used for tasks, rewards, and navigation targets.
* **Sensor anchor** a placed pose for a camera, depth camera, lidar, IMU, or
contact sensor, so your robot perceives the scene from a known location.
The Inspector exposes:
* **Transform** position and rotation (and scale), edited numerically or with the
viewport gizmos.
* **Dimensions** the primitive's size parameters.
* **Material** surface type and color, with physically based presets (metal,
plastic, wood, glass, rubber, and more).
* **Rigid physics** mass, density, friction, and restitution, plus advanced
options like continuous collision detection, linear and angular damping, and
center of mass.
* **Robotics properties** on assets: body type (dynamic, static, articulated,
kinematic, or visual-only) and collision approximation (convex hull, box,
sphere, capsule, trimesh, or compound). These map directly to how the asset
behaves in the simulator.
* **Joints** the joint type and its limits, stiffness, and damping for articulated
parts.
The **Asset Library** tab (next to Inspector) lists every asset generated for
this scene, so you can re-insert copies without regenerating. It also has an
**import** button for bringing in your own USD, USDZ, or GLB assets.
After generating, it is worth a quick check:
* Are the dimensions reasonable for a robot to interact with?
* Are doors, drawers, and lids grouped correctly?
* Do joints rotate or slide in the expected direction (use **Play**)?
* Are collision shapes present and is mass / friction populated?
## 8. Set up the scene for robotics
The **Robotics** tab and the **Robotics** menu add the entities a simulator
needs beyond geometry:
* **Robot spawn** marks where (and which) robot enters the scene. Use the
**Robotics > Browse robot library** dialog to search the built-in MuJoCo
Menagerie catalog or pick from your own uploaded MJCF/URDF robots. You can
also embed a specific robot at export time (see step 10).
* **Semantic region** a named volume (for example "pickup zone" or "goal area")
used for tasks, rewards, and navigation targets.
* **Sensor anchor** a placed pose for a camera, depth camera, lidar, IMU, or
contact sensor, so your robot perceives the scene from a known location.
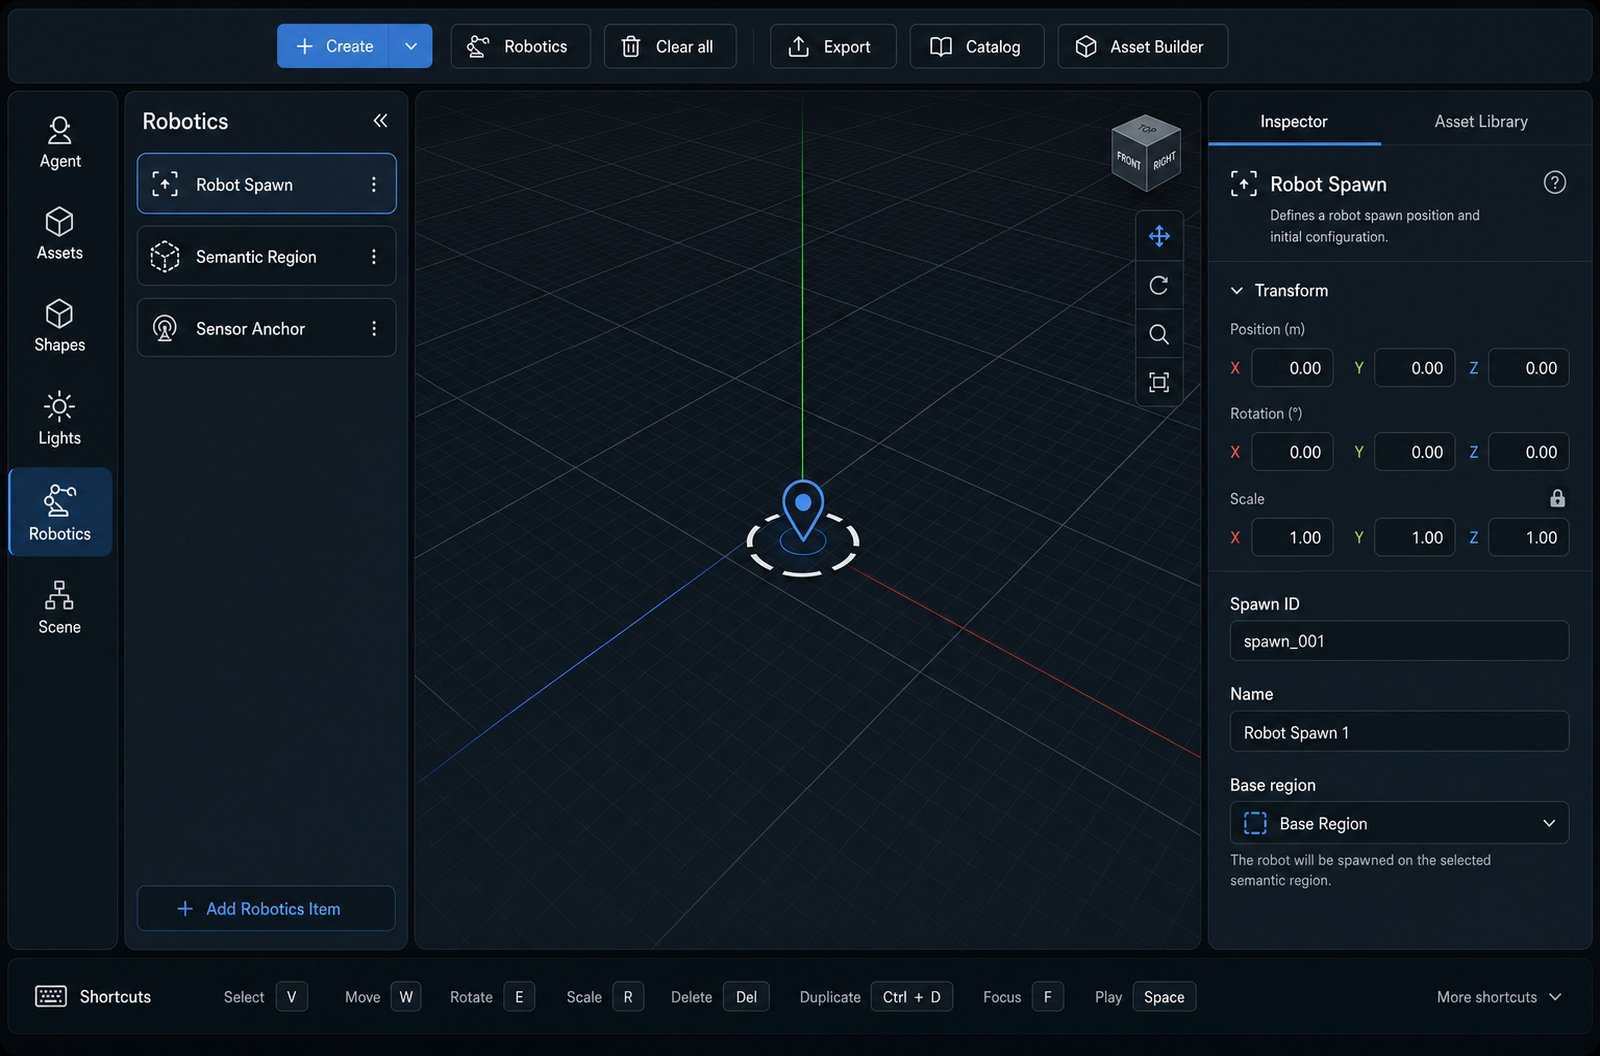 Select any of these to position it and edit its properties in the Inspector, just
like a primitive. A sensor anchor, for example, exposes its sensor type (RGB,
depth, segmentation, lidar), field of view, and resolution; a robot spawn exposes
its name and base region.
## 9. Scene settings and physics defaults
Open the **Scene** tab to configure how the whole scene compiles and simulates.
These defaults apply to every object that does not override them, so setting them
once here saves a lot of per-object tuning.
* **Scene type** manipulation, navigation, loco-manipulation, dexterous, or
custom. This signals the intended task.
* **Export target** Isaac Sim, MuJoCo, or both, so the scene compiles for the
right backend.
* **Compile profile** preview, default, fast (low fidelity), accurate (high
fidelity), or GPU-accelerated, trading speed against fidelity.
* **Global physics** gravity, default friction, default restitution, and the
simulation time step.
* **Solver settings** the integrator and friction cone, the PhysX solver (for
Isaac Sim), and the MuJoCo solver with its iteration and tolerance controls
(important for stable RL training).
* **Aerodynamics** optional air density, viscosity, and wind for scenes that use
soft bodies or fluid shapes.
Select any of these to position it and edit its properties in the Inspector, just
like a primitive. A sensor anchor, for example, exposes its sensor type (RGB,
depth, segmentation, lidar), field of view, and resolution; a robot spawn exposes
its name and base region.
## 9. Scene settings and physics defaults
Open the **Scene** tab to configure how the whole scene compiles and simulates.
These defaults apply to every object that does not override them, so setting them
once here saves a lot of per-object tuning.
* **Scene type** manipulation, navigation, loco-manipulation, dexterous, or
custom. This signals the intended task.
* **Export target** Isaac Sim, MuJoCo, or both, so the scene compiles for the
right backend.
* **Compile profile** preview, default, fast (low fidelity), accurate (high
fidelity), or GPU-accelerated, trading speed against fidelity.
* **Global physics** gravity, default friction, default restitution, and the
simulation time step.
* **Solver settings** the integrator and friction cone, the PhysX solver (for
Isaac Sim), and the MuJoCo solver with its iteration and tolerance controls
(important for stable RL training).
* **Aerodynamics** optional air density, viscosity, and wind for scenes that use
soft bodies or fluid shapes.
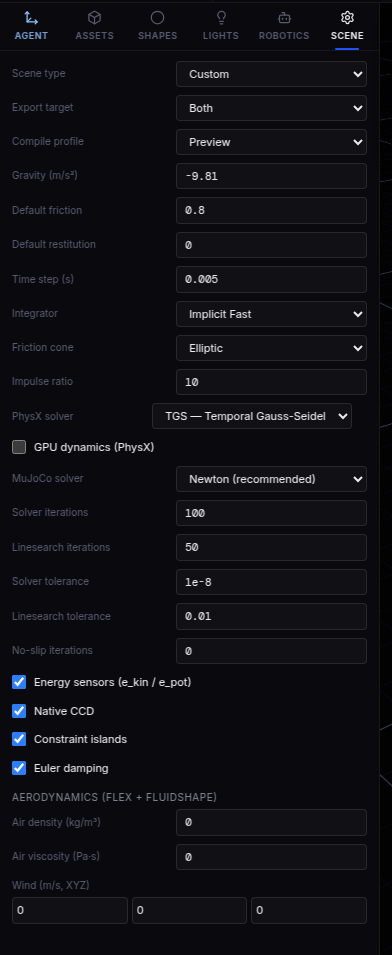 If you are not sure, leave these at their defaults. Gravity of -9.81 m/s²,
default friction, and the recommended solver work well for most manipulation
scenes. Revisit them only when simulation behavior looks off.
## Save your work
The scene **autosaves** as you work. The **Save** button in the toolbar turns
green whenever there are unsaved changes; click it to save immediately, and it
shows a checkmark once everything is stored. There is also a **Clear all** button
next to it that empties the scene, so use it deliberately.
## 10. Export to your simulator
When the scene is ready, use **Export** in the toolbar. The same scene can be
exported to multiple targets, and joints and physics come along, so it is ready
to simulate.
If you are not sure, leave these at their defaults. Gravity of -9.81 m/s²,
default friction, and the recommended solver work well for most manipulation
scenes. Revisit them only when simulation behavior looks off.
## Save your work
The scene **autosaves** as you work. The **Save** button in the toolbar turns
green whenever there are unsaved changes; click it to save immediately, and it
shows a checkmark once everything is stored. There is also a **Clear all** button
next to it that empties the scene, so use it deliberately.
## 10. Export to your simulator
When the scene is ready, use **Export** in the toolbar. The same scene can be
exported to multiple targets, and joints and physics come along, so it is ready
to simulate.
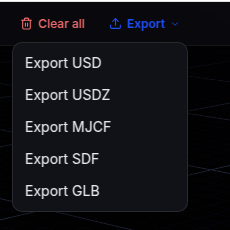 | Target | Format |
| --------------------- | ---------------- |
| Isaac Sim / Omniverse | USD / USDZ |
| MuJoCo | MJCF zip |
| Gazebo | SDF world bundle |
| Mesh interchange | GLB |
You can optionally embed a robot at export time. The export dialog shows a
**Robot Embodiment** selector: pick "Use each spawn's robot" to keep the robots
assigned to each spawn, or choose a specific robot (Franka Panda, UR5, etc.) to
override every spawn. For the details of what each format includes, see
[Export Behavior](/export-behavior).
## A typical end-to-end flow
1. Describe the asset or scene on the **Agent** tab, optionally with a reference
image.
2. Watch the pipeline finish, then **chat** to refine it.
3. **Navigate** the viewport and press **Play** to check joints and stability.
4. Add anything missing by hand (**Create** menu, **Catalog**, **Asset Builder**).
5. **Inspect** key objects to tune dimensions, materials, mass, and joints.
6. Add **robotics** entities (spawn, regions, sensors) and set **Scene** physics.
7. **Save**, then **Export** to your simulator.
## Next steps
* [First Workflow](/first-workflow) a condensed generate, preview, export run.
* [Starter Prompts](/starter-prompts) prompt ideas that generate well.
* [Joints and Physics](/joints-and-physics) how articulation and physics work.
* [Troubleshooting](/troubleshooting) fixes for common issues.
| Target | Format |
| --------------------- | ---------------- |
| Isaac Sim / Omniverse | USD / USDZ |
| MuJoCo | MJCF zip |
| Gazebo | SDF world bundle |
| Mesh interchange | GLB |
You can optionally embed a robot at export time. The export dialog shows a
**Robot Embodiment** selector: pick "Use each spawn's robot" to keep the robots
assigned to each spawn, or choose a specific robot (Franka Panda, UR5, etc.) to
override every spawn. For the details of what each format includes, see
[Export Behavior](/export-behavior).
## A typical end-to-end flow
1. Describe the asset or scene on the **Agent** tab, optionally with a reference
image.
2. Watch the pipeline finish, then **chat** to refine it.
3. **Navigate** the viewport and press **Play** to check joints and stability.
4. Add anything missing by hand (**Create** menu, **Catalog**, **Asset Builder**).
5. **Inspect** key objects to tune dimensions, materials, mass, and joints.
6. Add **robotics** entities (spawn, regions, sensors) and set **Scene** physics.
7. **Save**, then **Export** to your simulator.
## Next steps
* [First Workflow](/first-workflow) a condensed generate, preview, export run.
* [Starter Prompts](/starter-prompts) prompt ideas that generate well.
* [Joints and Physics](/joints-and-physics) how articulation and physics work.
* [Troubleshooting](/troubleshooting) fixes for common issues.